Jump to content

2000 Watt Custom Cooled Closet And More


GrowGoddess

3,209 views

I thought I would add some information to my blog about how I built my flower room.


I started off sacrificing my bedroom :( and had to sleep in my living room for almost 9 months! I have a new bedroom now though :).


The bedroom measured approximately 11' x 12' with an 8' ceiling and a crawlspace underneath. I chose (2) 1000 watt switchable ballast lights to go with 50 Watts per square foot. I am running 7,500 lumen of light per square foot. The closet comes out to be 40 square feet in size, which measures approximately 4.5' x 9'.


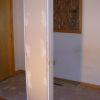
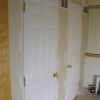
There was a window in the closet which I removed and boarded up with insulation and wood and used that to install the ports for exhausting my fans. I went with (2) outdoor pre-hung triple insulated doors for full lightproof and convenience of accessing the plants. To the left of the closet you can see a door, that is there to access the furnace pipe mostly, it was a tiny closet for the bedroom, it was pretty much unusable space for the flower room, so I painted the door white.


Closet 2


Closet


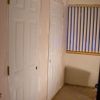
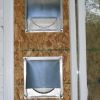
In this next picture, you can see I added 3 vents on the outside of the closet at the top. The vents go through the wall cavity and they work like light traps. There are 3 vents on the inside of the closet at the bottom near the floor. This is so the closet can intake air and be able to breathe while the lights are on or off.


2000W dual door flower closet


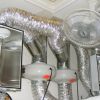
In this picture you can see I added (2) 6" high output can fans 440 cfm each for a total of 880 cfm exhaust out the vents where the window was.


Fans before vent tubing


Fans after tubing


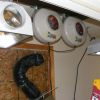
Here is a picture of the outside window vents each 6" with dampers.


Exhaust Vents


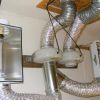
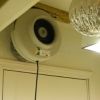
In this picture you can see the lighting system is done and there is also in the center a 16" osculating wall mount fan. For the custom cooling, I took the lenses out of the light hoods so that I can exhaust air from both ends of the light hoods, so there is suction from each end of the light for maximum cooling efficiency. Each fan is hooked up to each hood so that I can have the option to run only one fan but still run both lights. Like in the winter when it is cold, I only need to run one fan. It also serves a safety purpose. If one fan fails, the other fan will still be cooling both lights. I did the same with the electrical, each fan is plugged in on a separate breaker/fuse.


custom cooled 2000W closet


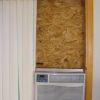
The room needed an air conditioner for the hot humid summers, minimum required 12,000 BTU. This had to be custom installed too, my windows slide open sideways.


Closet


12000 BTU AC


Well, after building it all like above, the system worked, but I wasn't fully satisfied with the cooling and the efficiency of it. So I added an 8" high output can fan at the ceiling, I call this an air exchange fan. It only takes air from the grow closet and back into the main room. It helps keep the air temps balanced between the closet and main room. This solved a lot of problems. Like in the winter, the main room was too cold which made it unusable, even though the flower room temps were just fine. If I restricted fresh air from outside to prevent the room from getting too cold, then I was exhausting heat out of my house just as fast as it was going in. Now with the air exchange fan, that is not a problem, in the winter, I am only exhausting about 100 cfm out of the flower closet. The air exchange fan at 740 cfm putting warm air back into the main room now lets the room be usable, there is only about a 5 to 10 degree temperature difference between the main room and flower closet. The air exchange fan also helps with the closet getting too cold in the winter during lights off. Also, during humid times of the year, it helps prevent mold/fungus issues in the flower room. The air exchange fan is set up to be light proof. I can leave it running at night and keep the temps right where I want them. One other benefit of installing the air exchange fan, I was able to make use of that dead space where the furnace pipe is. cool.png


Air Exchange Fan


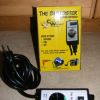
All three fans are equipped with a speedster speed controller so I can adjust the cooling system to meet any temperature I desire by dialing up or down the fan cfm. Now, after all of this, the lights and cooling system are all working in harmony.


Speedster Fan controller


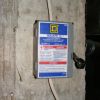
Here is a picture of the electrical (it is not complete in this picture). The ballasts and the electrical is mounted in the crawlspace. I choose a 220 breaker that goes to a throwbox which converts it to (2) 110 outlets with slow blow fuses.


Switch Box


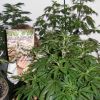
Here is a picture of my first test run with the closet, there are 12 plants in this picture, I typically only have 8 bigger ones flowering.


GGs Perpetual Grow 2000 Watt Closet 2 24 2010 (800x600)


Me and my babies in the closet.


Querkle left   Dr. Atomic BBJ right 2011 02210098


Some more pics from this closet.


Querkle In The back   Dr. Atomic BBJ In front 2011 02210038


Querkle Feb 2011


Querkle And Me In The Big closet

8 Comments


Recommended Comments

I am really surprised that this blog has the fewest views considering how long it has been here. Kind of baffles me really.


I am going to be making some big changes to this closet-grow room. After running it for about 5 years now I have decided to focus my attention to my grow room since our politicians have chosen not to do their jobs. Actually they are doing the opposite of their job. They are blocking bills and preventing progress in the state of Michigan in my opinion.


I have given up on the idea of a larger grow. I shut down my smaller grow room and am confining my entire grow operation into one room. I was using two rooms. It was annoying using two rooms because I had to build a custom gate to block off the hallway and be lockable so I could be legal. (Enclosed, locked facility). Actually, I am kind of glad. I can't say I have ever truly mastered a full grow room. That is after 15 years of consistent growing. I am going to master it now. I am changing the entire ventilation and making it to where the grow room is completely attached to the house, but completely sealed from the house. It is great that I am removing the gate. My house is going to be more like a normal house. I can have visitors that would now have no clue that there is a grow room at all. I am going to have the option to vent air from my house and completely sealed to where it has no effect on the rest of the house. It will require the use of CO2 in the winter with the option of CO2 year round. I would have to add a portable air conditioner to do that though. I have done a lot of construction and made a lot of changes. It is not going to be easy to explain everything with photos and typing, but I will do my best. For now I am just going to show the hallway with the gate open. In the picture you can see a new door at the end of the hallway. It is an exterior door which is triple sealed. It helps with noise from the fans running in the grow room. It also helps with the grow room stink. If I have a bug problem, as long as I am not flowering, I can hang up some HotShotz and not be concerned about any of the poison making it into the rest of the house. Yet, if I choose, I can have the grow room vent through the house, pull all of the air from the house or no air from the house, all under my control. Double and triple sealed. I will explain more about this later.


hallway 9 27 14 058


My goal now is to completely master my entire grow in an 11' x 12' room and use all of the space available to the best of my abilities.

Link to comment

I would like to mention, after nearly 5 years of running consistently, how the products held up.


Let's start with the good. Can Fan's, no failures, they are great. That is all I will use after seeing how they are flawless. I use the HO type in 6" and 8". The only bummer with the 8" is using the Speedster fan speed controller, you can't turn it all the way down or the fan will stop running. I am not complaining, there is just not enough power on the lower setting to operate the fan.


I have not had a Speedster controller fail yet, they all work great.


The HydroFarm light hoods I have no complaints with either. Except for the fact that the model I have has a custom pre-wired plug so you can't just simply use a different brand ballast without an adapter. That is my only complaint with the hoods.


The 16" AirKing oscillating fan did recently die and I had to replace it. Just recently so basically it has ran for nearly 5 years, can't really complain about that, it was well worth it. The only downside, I replaced it, but that one will no longer be part of my remodel. I am switching to the clip on type. 10 of the 6" fans will now move air in the remodeled flower room. I do prefer the smaller fans. They are less aggressive and much more gentle with two speeds. Also, they will not be blocking any light between the (2) 1000W lights. I believe this will be an improvement. I choose AirKing because I was so satisfied with the first 16" oscillating fan.


Really, the only thing left is the bad and that is the ballast. They work great, are super quiet, but as far as I am concerned, they are junk. What ballast? The HydroFarms Powerhouse magnetic switchable and the non switchable 8-year warranty ballast. Between each of my flower closets, I have had a 100% failure rate with the ballast. They work great and all, maybe I shouldn't say they are junk, but they do not outlast their warranty. They are overpriced compared to the 5-year warranty made in China models. All of the PowerHouse ballast that i have ran continuously have been either repaired or replaced by HydroFarms. I am 100% confident it is with their product and not how I am using them. They are receiving appropriate power and they are in a nice cool, dry, well ventilated location. There is no excuse for them going bad. At this point, if anyone asked, I would have to recommend their lower end models that are manufactured in China over the PowerHouse which are made in USA and Canada. Pretty sad that I would choose a product made in China over one made in USA. If I order any more HydroFarm ballast, they will be the Chinese made. I am not proud to say this, but it is true.


Other than the issue with the HydroFarms USA made ballast, I have no complaints with any of the products I am using. I quickly learned to have a back up of every single imperative part for the grow room. I was not accustomed to needing a back up. My old home made lighting system (400W HPS) ran for over 10 years without a problem.


I just have to say this, CanFan's are the whoop. Failure free within warranty life.

Link to comment

Time to get started on the updates. Not going to be easy to explain and it is currently under construction as I write this. I am not going for looks, I am going for function and also making it to where my household can function without the distractions of a grow room.


Actually, I want to make it to where the grow room helps my living conditions. It is no good to exhaust heat from the house in the winter. I am going to solve this problem and more.


Now this is a room that is 11' x 12'. The flower closet is a little bit bigger than 4' x 8'. Inside the flower closet there is a small closet. I just painted the door white and keep it closed. I wanted to make full use of this mini closet that resides inside my flower closet. As I mentioned above, I installed an 8" air exchange fan. It exhausts air from the flower closet into the rest of the room to help keep the temperature balanced. I ran the venting through the mini closet. That was not enough use for the mini closet.


Here is a picture of the 8" air exchange fan.

Can Fan 9 27 14 063


It sucks air from the flower closet and pumps it into the main room. There is a damper so it is light proof when the lights and fan are off. It is light proof anyway due to the design.


Now utilizing the lower parts of the mini closet. I installed (2) 8" vents with all top of the line HVAC equipment. Everything is completely sealed. These two 8" vents do not have any fan attached, but serve a couple of different purposes. They do not enter the flower closet. The 8" vents allow me to pull all my air from the house if I should choose to. There are vents in the grow room and there are vents in the household that can be opened and closed as needed. In using the pre-hung exterior door and the vents having the ability to be closed, and since I went around and caulked, spray foamed, sealed everything, the entire grow room is air tight. There is a window in the grow room that I can open to pull fresh air from if I should choose. All I do is close the vents and it will only pull air from the window in the grow room. I can also only pull air from the house buy closing the window and opening the vents. I like to have options.

vent tubes 9 27 14 061

 
Here is a picture of the interior of the house where the 8" vents can vent to if chosen. The two lower vents in this picture.

intake vents 9 27 14 075

 
Now the vent above the two others is a 6" vent. It works the same way, it goes from the house, through the mini closet, but not into the flower closet. I decided to use just a regular vent damper that is in the grow room. On the interior of the house the vent is also sealed and closable. The purpose of the 6" venting system is so I can force air into the grow room from the house. I have a 6" HO can fan attached to it. One purpose for this is when it is sub zero weather and my flower closet lights are off, it gets cold in there. Now I can pump warm air into the room when needed. The 8" vents will allow the cold air to return to the interior of the house and relieve any pressure in the grow room. Also, the 6" fan can assist my flower closet exhaust system which is currently put together using (2) 6" HO Can Fans. I need all three vents because I plan on adding one more fan for exhaust and air exchange, either or. I don't have that hooked up yet.

vent tubing 9 27 14 078

vent tubing 9 27 14 077

 
During construction

exhaust 9 27 14 062


It is not that pretty. On the inside of the grow room, here is what the vents look like. When it is all said and done I will have some finish work done to the drywall. (Textured mud)

I will try to explain the vents. On the upper right is one of three vents that I mention in the original entry so the flower closet can breathe naturally. The vents I want to point out, at the very top is an 8" vent with damper and a fan attached. Below that is a 6" vent with damper and fan attached. Below that is two more 8" vents with no fan attached.

return exhaust 9 27 14 060

 
Here is another picture of the exterior door. Kind of camouflage from inside the house. This picture is from inside the grow room.

In room 9 27 14 064

 
Now for inside the flower closet. The (2) 6" HO fans simply exhaust right outside from an old window which is boarded up. I have decided to remove the lower 6" exhaust from the flower room because the tubing is blocking light from the plants and consuming useable space. This is where it gets to be not so pretty, again, not going for looks as much as function. It is not complete in this picture but shows the general idea what I am doing. The fan is mounted outside of the flower closet now and exhausts above the room air conditioner with a basic vent damper. Another purpose of doing this is in the really cold months I can detach the exhaust and pump the warmed air into the grow room and there will no exhausting going on at all. That is when I am going to start using CO2.

Can Fan In room 9 27 14 087

CO2 9 27 14 066


The CO2 regulator box has a misprint. It shows that the unit has a 1-year warranty, but the manufacture offers a 3-year warranty according to Growco Indoor Garden Supply.


As you can see, in the picture with the fan exhausting above the air conditioner, there is an additional damper set up. That is going to be for one more 6" fan hooked up in a similar fashion that can exhaust or exchange air from the closet to the grow room. The purpose of doing that is to keep the temperatures balanced. I want the grow room and flower closet temperatures to be as close as possible. When I get that fan hooked up it will solve a problem. At night or during lights off, I like to leave the air exchange running to help prevent mold. The problem with the 8" fan is when I turn the controller all the way down the fan stops running, just not enough power. I do not have that issue with the 6" fans. All in all, I will be able to reduce the airflow during lights off. If I choose to plug it in to the damper at the AC, I can also increase the exhaust capabilities, which will make it to where I will be able to run the AC less often.


I have a long way to go. This stuff can get quite expensive, it adds up fast. To make it even more difficult, most of this work can only be done when the plants are not flowering. I do not want any construction debris getting on the flowers. As soon as I can I will be adding more details of the progress. I am hoping to have the flower closet completed within 2 or 3 months. It will take me a lot longer than that to complete the entire grow room. For veg growth I do not currently have anything special. Just tables with fluorescent lights hanging over them. Need to make some upgrades to that area too. I will post those improvements here as they get done.


Here is a small sample of some of the parts I used in this modification. I have many more parts to go.

Parts 9 27 14 053

 
It adds up quite a bit. I haven't even shown a picture of the inline can fan dampers. Those cost $25 and up, but they work really well. When I get a chance I will post a picture of them.
 
Still working on finishing up the exhaust system on the outside of the flower closet. Right now it is in a temporary state.


Link to comment

Here are a couple pictures of the CanFan 6" inline damper.

CanFan inline damper open 10 11 14 015

CanFan Inline Damper closed 10 11 14 016


They are really worth the money. They have almost no restriction on the airflow. They have a high quality feel. Great for light proof, good for any back draft prevention. The design is really good on them.


Either way, I like them. A good product.


Here is where I got the dampers and also where I get most of my grow room supplies. https://4hydroponics.com/can-fan-backdraft-damper

Link to comment

Ouch!


Can Fan In room 9 27 14 087


I made more progress with this and I invested more into it to get it just the way I wanted. Then I got b itch slapped, rude awakening. A whole new design and set up is a must. Luckily it is the cooler months right now and I can get by with just one exhaust fan. At least I have until spring to come up with a new idea. I have some ideas floating around. THE REALITY IS -- STEALTH IS A MUST --


I had an unwanted and very unexpected visitor. I did not allow them to do what they wanted, take a look around the house with a camera. I did an emergency stealth job in less than 24 hours. I have come to the conclusion any exhaust fans have to be stealth or appear to be something else legitimate. What I was doing was going to be a little obvious something was up and these days, that is all they need to pull a warrant. If somehow this person is legally able to do what they requested, they will now find nothing out of the ordinary. It does complicate some things though. Too bad one cannot grow legally without risk of harassment. What they don't know, can't hurt me! I am going to keep it that way, I don't want anybody knowing anything.


As soon as I make some decisions, I will be showing the progress.


STEALTH -- STEALTH -- STEALTH -- A MUST.


Just going to treat the grow as if it were illegal from know on. I can't help but to believe that growing legally, having a card is kind of a trick. It puts your guard down, makes you think you are safe, and that is not true, you are not safe. At least that is the way I feel.


My additional exhaust fan that needs to exhaust out of the house will be installed 100% stealth. When I make it to that point I will show how. At least I have until Spring to get it figured out!


That won't stop me from working on the 11 x 12 room and getting a decent veg area put in. Progress will be updated.

Link to comment

Very nice set up! We had a 11 x 13 room for veg and flower and it worked well. Removed the room for a couple reasons, hope to sell home and move. We vented out a window also, with no neighbors close to notice. Still was not happy with setup and will change vent next time.


Just now getting to view the blogs. Thanks


Thanks for taking the time to look over the growroom blog. Not many have.


I have to admit, you are correct. Even though I am now only exhausting out of one visible vent, which could be explained as a dryer vent without a doubt, even though it is through a window, I could put it out the wall if I wanted, I am just not satisfied. The temps are just fine. I have no complaints with the operation, it is the need for stealth that bothers me. (Trust me, I know!) There is a better way to vent, much better. I can't remember the proper name, but it is like a little steeple at the center of the roof pitch. Best would be to vent out that all through the attic with insulated flexible ducting, then up out the steeple at the center of the roof so there are no signs of a vent and you can choose any size fans you wish to use. I would have pictures and have it all done, but it just seems I have had to take care of everything else but the grow room. I am sure many can relate.

Link to comment

Venting through the ridge vent would be the safest. At time I didn't want the hole through the drywall, good idea for next grow room. Kinda like venting a bathroom fan into the attic. I will read up on your other blogs soon.


Especially the rso extraction process. Plan on trying the rso this fall, so will have question later on.

Link to comment
Guest
Add a comment...

×   Pasted as rich text.   Paste as plain text instead

  Only 75 emoji are allowed.

×   Your link has been automatically embedded.   Display as a link instead

×   Your previous content has been restored.   Clear editor

×   You cannot paste images directly. Upload or insert images from URL.

Loading...
×
×
  • Create New...